Understanding dough temperature and its effects on fermentation is critical to mastering the art and science of baking bread. But, why? Mastering dough temperature can help you gain control of your dough and the bread produced from it, on a deeper level than you’re thinking right now. Let me explain –
What, Why, And How?
When baker’s reference “dough temperature,” they are referring to the temperature of their bread dough during bulk fermentation, beginning directly after the dough is mixed and ending just before the dough is shaped. Tracking and controlling the temperature of your dough can help you control the rate of fermentation, which can significantly impact the final characteristics of your bread.
To understand how significantly dough temperature can affect fermentation and bread, it is important to understand the depth of fermentation. The temperature of your dough affects more than just the time it takes for your dough to ferment. It also affects the balance of microorganisms in your starter and bread dough, which affects the strength and fermenting capabilities of your dough.
To dive a little deeper (while also avoiding too much complexity) we have to understand that the leavening agent in our bread is a blend of yeast and different kinds of bacteria that are transferred to our dough through our starter. This being said, nothing will save our bread dough if our starter is out of whack. However, assuming it’s not, we have a perfect balance of CO2, lactic acid, and acetic acid that aerate and flavor our dough.
When dough temperatures are too warm, we encourage the reproduction of a kind of bacteria called homofermentative lactic acid bacteria (homofermentative LAB) over yeast. Homofermentative LAB reproduce faster than yeast already, so when temperatures are in their favor, they really take over. Homofermentative LAB break down proteins in your flour and create extensibility (your dough’s ability to stretch), which is only good until it isn’t, and the gluten structure is completely broken down before the loaf is aerated to its maximum potential.
When temperatures are too cold, yeast move very, very slowly. While the yeast are slowly inching along, other strains of bacteria are continuing to reproduce, leading to complex, and eventually very sour, flavors in your bread. It may even seem that your bread is hardly rising at all. Likely, your bread will not rise to its fullest potential before becoming extremely sour, due to the sluggish yeast – leaving you with a dense bread whose flavor just isn’t quite right.
So, what is an ideal dough temperature? 73-75 F (23-24 C) seems to be a perfect middle. You can get maximum aeration from the yeast, as well as great structure in your dough and a delicious complexion of flavors. I do not recommend fermenting colder than 70 F (21 C), though the cooler dough makes overnight sourdough possible. Last, you can go as high at 78 F (26 C), but in my experience, the resulting bread does not have near as good of a texture – it is nowhere near as light and airy as the bread fermented in cooler temperatures.
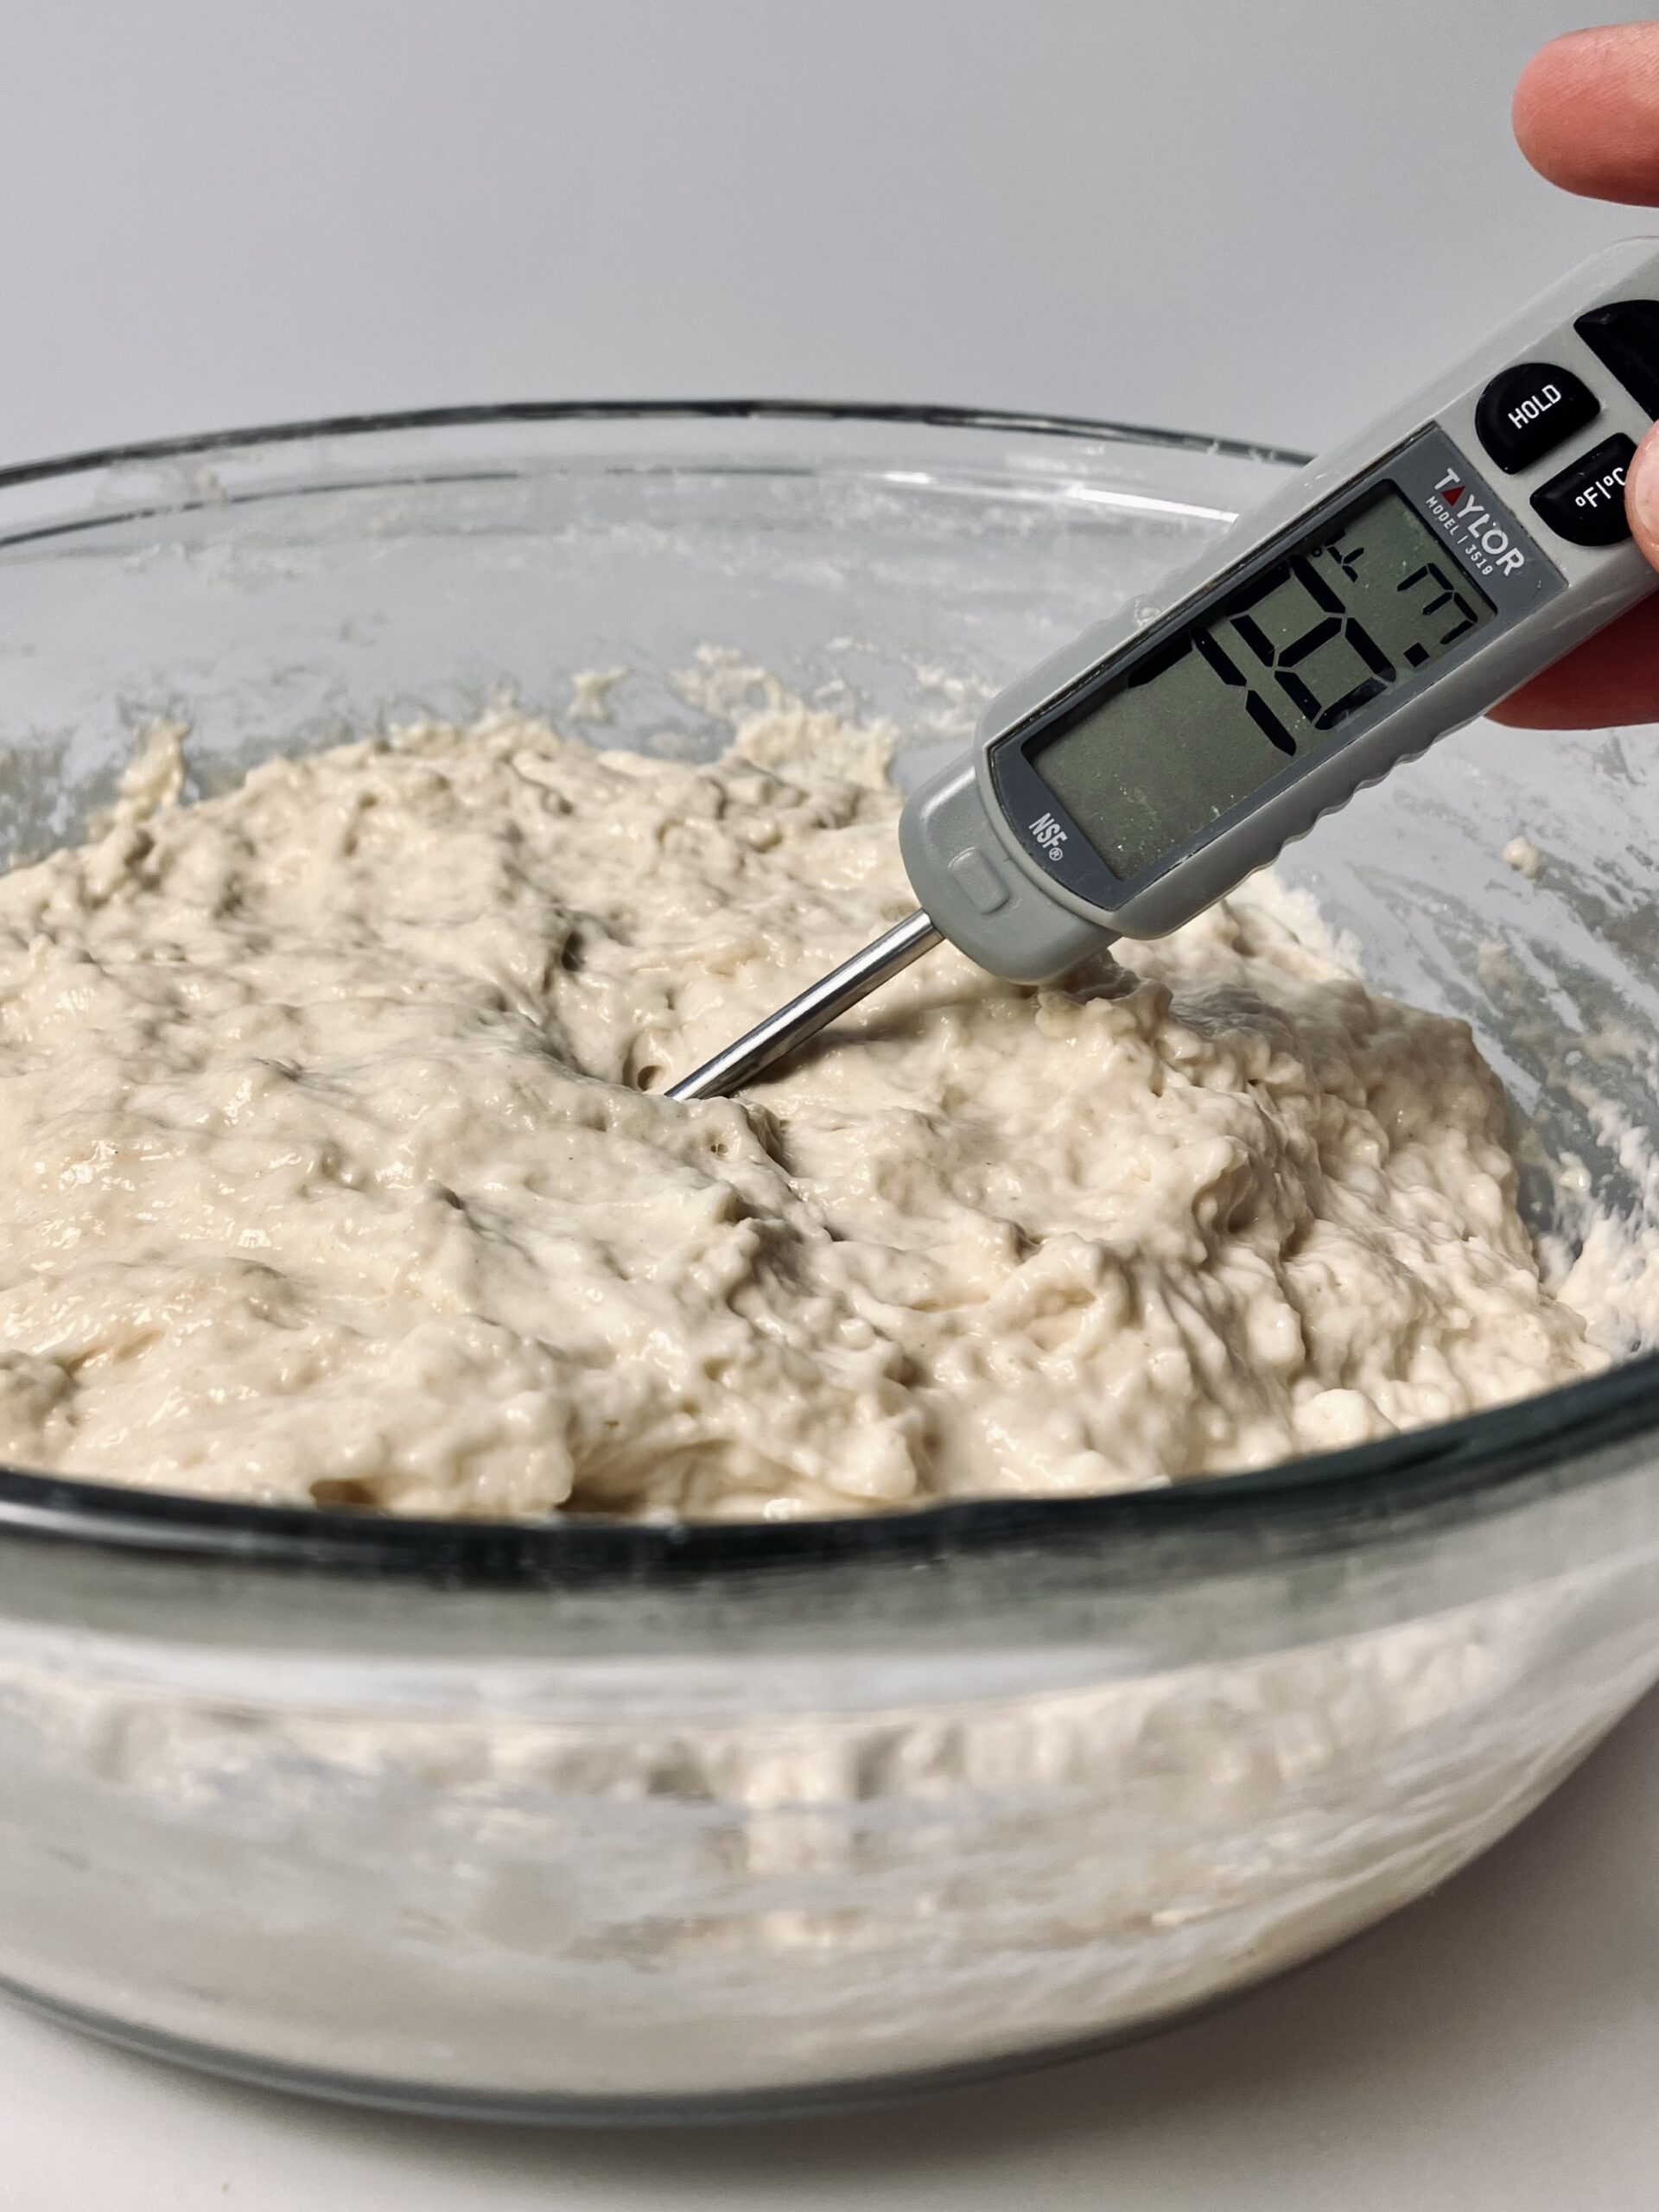
To track your dough’s temperature, you need an instant-read thermometer. Once you have finished mixing your dough, stick it right into the middle of your dough and check the temperature. This will give you an idea of how your dough will perform during bulk fermentation: the speed at which it will rise, how fast the gluten structure will break down, and what kind of flavors might be present in your bread after baking. To keep the dough temperature consistent, it is helpful to keep the dough in an environment similar to your desired dough temperature, which for me is around 73-75 F (23-24 C). You can also use the environment to help warm or cool off the dough, checking your dough’s temperature periodically during bulk fermentation to make sure you are on track.
A proofing box or any kind of device that can maintain a low temperature (I use my toaster oven because it goes as low as 60 F [15.5 C]) is a great tool for maintaining your desired dough temperature (also known as DDT). It can be an investment, but one that is well worth it if you are a serious baker looking for consistent results.
Of course, there are other, cheaper, less consistent alternatives. You could use: a seedling or dough mat to warm the dough from the bottom or sides, an oven (not running) with the light inside turned on, a microwave with the door shut (and maybe a cup of very hot, steamy water inside), or an insulated lunchbox with an ice pack (if you needed to cool the dough). In these instances, it is definitely helpful to check the dough’s temperature throughout bulk fermentation in order to make sure everything is on the right track, and that the dough is not too hot or too cold.
Altogether, when dough temperature is measured and maintained throughout the fermentation process, and the same dough temperature is applied to each and every loaf of bread, the baker can better predict fermentation with each loaf and produce more consistent results in their bakes.

Do I Have To Keep Track Of Dough Temperature?
Absolutely not. It is not essential to track dough temperature in order to make good bread. What is more important is understanding how the entire process works together to create a loaf with the characteristics that you like in your bread.
Tracking dough temperature is like a crutch, but also a good habit. It can help you nail fermentation even before you understand it. Then, when you do begin to understand fermentation, tracking your dough’s temperature can help you keep track of your dough (double-check yourself, in a sense). It’s your sidekick to producing consistent bakes. Being able to read fermentation is an advanced skill that comes at the cost of many loaves of bread (I am still figuring it out), but it is the secret to success. Understanding the impact of dough temperature can help give you success even before you truly understand why you are successful, kind of like following a recipe can help you make a good meal even before you are aware why each step was taken.
A Deeper Dive Into Dough Temperature (Plus How The Refrigerator Can Affect Our Dough)
At this point, you already know that the temperature of your dough can impact both the rate of fermentation and the balance of microorganisms in your dough. How can we use this to our advantage?
Because the ideal (or my ideal) temperature for balancing microorganisms in our dough is 73-75 F (23-24 C), we can strive to keep our dough in this temperature range for the majority of bulk fermentation. This way, we can be assured that our dough is maximally aerated and structured during fermentation. Then, once we get our dough to this point, we have options. We can shape it, let it relax and ferment some more, and then bake it right away. Or, we can develop complexity in our bread + extend the baking timeline.
I love to use the refrigerator at some point in my sourdough bread recipes whenever possible, or (at least) whenever it makes sense. To keep bulk fermentation around 73-75 F (23-24 C) means the dough must ferment for 9-10 hours before it is shaped. This can make it impossible to make a loaf of bread in one day, unless I want to be up really late at night. Or, I could ferment my dough overnight, but then I would not be able to observe/structure my dough (folds) throughout the bulk of fermentation. Using the refrigerator does make sense, and it can be a helpful tool.
Yeast will continue to multiply and aerate your dough in the refrigerator, they are just significantly slowed. If your dough is already mostly finished fermenting, this is not an issue. While the yeast slow, different kinds of bacteria continue to work, producing more complex flavors in your bread. While the bacteria will eventually break down your gluten structure and result in a sour loaf, twelve to sixteen hours in the fridge for a properly developed and fermented bread dough will not do any harm.
Working with a cold dough has other benefits too. I find that alongside an expanded baking timeline and greater depth of flavor, my loaves are easier to score. And, sticking a cold dough into a piping hot oven can really create an explosive effect as yeast are rapidly multiplying and releasing CO2 gases up until their death.
The refrigerator can be a bit tricky when we open the range of bulk fermentation to warmer or cooler dough temperatures. That’s because warmer dough takes longer to cool in the refrigerator. This means a warm dough will be aerated by yeast for a significantly longer period of time than a cooler dough, who already possesses sluggish yeast. This does not even touch on the imbalance of microorganisms already present in our dough and how the refrigerator can only make a bad situation worse.

Dough That Is Too Warm
For example, it is a common practice to aim for 78 F (26 C) as the ideal DDT (desired dough temperature). In these warm temperatures, those homofermentative LAB are happily working to break down your dough’s structure. While the yeast will move quicker, they will not move as fast as the homofermentative LAB. Therefore, it is likely the dough’s structure will break down (the dough will overproof) before the yeast can fully aerate the dough, producing a bread that far less fluffy than a maximally aerated dough.
Now, throw the refrigerator into the mix. Your dough will cool down much slower. Yeast will continue to aerate until the dough cools off while the homofermentative LAB are already overpopulated and will continue to break down your dough’s structure. If you ferment the dough outside of the fridge for too long, you dough will overproof in the refrigerator, leaving you with a sticky dough that won’t hold its shape.
That’s why many recipes call for a size increase of only 30%-40% when using a DDT of 78 F (26 C). Your dough will not hold up in the fridge if it was fermented too warm. To compensate, the dough is fermented for less time, resulting in less aeration and denser, but very much tolerable, bread.
If you are someone who is after open crumb – you can achieve open crumb from a dough fermented in this manner. It’s an interesting work-around the entire process, and it’s a rabbit hole for another day. In essence, you have to create an overly extensible dough (not very strong; rather, weak, underdeveloped, and very stretchy). By pairing this with a very hot baking temperature, the lax structure of your dough will create large, irregular air pockets as the dough rapidly expands in the hot oven.
Dough That Is Too Cold
As counter example, let’s say your home is fairly cold, and your dough temperature resides around 65 F (18 C). Yeast are already sluggish in these temperatures, and your dough will move very slowly. Heterofermentative LAB are favored: a different strain of bacteria that produces acid that is noticeably sour, while also tightening your dough’s structure. This is the opposite of the homofermentative LAB. While homofermentative LAB break down your dough, heterofermentative LAB tighten it. Trying to blow up a tight dough is like trying to blow up a balloon with really thick rubber. It takes double the amount of air just to blow it up. Did you catch that? 2X the air with yeast that are just inching along. To top it off, while your microorganisms are sluggishly blowing up this really thick balloon, your dough is getting really sour.
Now, throw the refrigerator into the mix. At this point, you may be thinking – why would you even do that? But, let’s say you do. Your dough will look like it has made absolutely no progress. Yeast growth is slowed even more; meanwhile the excess of heterofermentative LAB have continued to tighten the dough and make it even more sour (because at this point, we’ve moved past the “complex” flavor achievable from proper balance).
Can you achieve an open crumb like this? I have never done it. The dough is too tight, and the yeast cannot expand their balloons (each areola) in the oven. Even if I did let the dough rest until I suspected it had aerated enough and skipped the refrigerator, I think the microorganisms would be so off balance that they would prevent the crumb from opening up. In other words, the dough would be too acidic (acidic dough keeps the crumb closed).
Controlling Your Dough’s Temperature From The Start

Many bakers are obsessed with controlling their dough’s temperature from the very beginning. To achieve their DDT (desired dough temperature) from the get-go, they do some math that will get their FDT (final dough temperature) as close as possible to their DDT. Maybe you are one of those bakers who wants to know how to get your dough’s temperature right on track from the very start. Let me show you how:
The formula for calculating DDT looks something like this:
DDT = (Temperature of Ingredients + Friction Factor + Ambient Room Temperature) / (Number of Variables – 1)
Temperature Of Ingredients
This is the temperature of each ingredient that goes into your dough.
For most artisanal breads, there are only a few ingredients: flour, water, salt, and sourdough starter. Usually, these ingredients are at room temperature, unless you store your flour in the fridge or your starter in a warmer. Water is the only variable that baker’s can precisely control, and they use this to their advantage by heating up the water to a predetermined amount, which helps them more closely achieve their DDT.
For enriched doughs, friction factor is so high (due to necessary increased mixing times) that baker’s making these doughs generally place all of their ingredients in the fridge to cool down, which helps keep their dough from getting too warm during mixing.
Friction Factor
Friction factor is simply the amount the dough will heat up when mixed – whether by mechanical mixer or by hand. Friction can be applied as an estimated, predetermined variable (basically, just a guess). Here are some variables you can use depending on your mixing method:
| Method | Speed | Time | Variable |
| Stand Mixer | Medium to High | 15-20 minutes | 30 |
| Stand Mixer | Low | 8-10 minutes | 25 |
| Hand Mix | n/a | 8-10 minutes | 5 |
| Hand Mix | n/a | 3-5 minutes | 0 |
Of course, every mixer and every mixing method will lend a different friction factor, so if you want an exact number – I’ve got you. However, a guess is generally good enough.
Ambient Room Temperature
This is the temperature of the room in which you are mixing your dough.
Controlling DDT Using Water Temperature
When calculating DDT to achieve a specific FDT, the baker is usually looking for the necessary temperature of an ingredient they can control. In most cases, this is water. The room temperature, temperature of flour, and temperature of starter can be somewhat controlled, but by the time dough is being mixed, these variables are what they are. Meanwhile, water can easily be heated up or cooled down to achieve a FDT as close to the DDT as possible.
To determine the temperature water should be to achieve DDT, the process goes as follows:
Plug known variables into the equation (below are simply example variables, and how each variable can be obtained) –
| Variable | Temperature | How To Obtain |
| DDT | 75 F | this variable is usually given in a recipe |
| Temperature Of Flour | 70 F | this variable can be checked by placing an instant-read thermometer directly into the bag of flour |
| Temperature of Salt | 70 F | this variable can be checked by placing an instant-read thermometer directly into the container of salt |
| Temperature Of Starter | 72 F | this variable can be checked by placing an instant-read thermometer directly into the sourdough starter |
| Temperature Of Water | ? | this is the unknown, controllable variable that is being searched for |
| Friction Factor | 5 | in this case, the dough is being kneaded by hand for eight to ten |
| Ambient Room Temperature | 70 F | this variable depends on the temperature of the baker’s home |
Using these example variables, the equation now looks something like this:
DDT = (Temperature of Ingredients + Friction Factor + Ambient Room Temperature) / (Number of Variables – 1)
75 = (70 +70 + 72 + X + 5 + 70) / (6-1)
Now, solve for “X” to determine the temperature of the unknown, controllable variable, which in this case is water.
75 = (287 + X) / 5
375 = 287 + X
88 = X
In this instance, heating the water to approximately 88 F will help achieve a FDT as close to the DDT as possible.
Finding The Exact Variable For Friction Factor
As previously mentioned, the friction factors given above are predetermined estimates that may or may not lead to the DDT you are looking for. To know how to adjust friction factor to suit your own mixing practices, you’ll need to take the difference between your FDT and your DDT and add it to the friction factor used in the original equation.
Friction Factor Too Low
For example, say I used the formula above, but my FDT was 77 F, off-shooting the DDT by +2 F, meaning my mixing method generated more heat than originally accounted for.
77 (FDT) – 75 (DDT) = 2
To adjust friction factor, add “2” (the difference between FDT and DDT) to “5” (the original friction factor used in the equation).
5 + 2 = 7
In this instance, “7” would be more appropriate to use as the friction factor the next time the dough is mixed in the same manner.
Friction Factor Too High
But, let’s say the FDT was 73 F, -2 F less than the goal of 75 F, meaning the mixing method generated less heat than originally accounted for. Follow the same steps:
73 (FDT) – 75 (DDT) = (-2)
To adjust friction factor, add “-2” (the difference between FDT and DDT) to “5” (the original friction factor used in the equation).
5 + (-2) = 3
In this instance, “3” would be more appropriate to use as the friction factor the next time the dough is mixed in the same manner.
Conclusion
Understanding how dough temperature can create different outcomes in your dough will only help you achieve better bread with more consistent outcomes. The temperature of your dough not only affects the rate of fermentation, but also the balance of microorganisms, which can create varying characteristics in your dough and the bread baked from it.

